


How I Shot And Edited A Photo Of The X-Men Nightcrawler
Jan 2, 2016
Frederic Amadu

We love it when our readers get in touch with us to share their stories. This article was contributed to DIYP by a member of our community. If you would like to contribute an article, please contact us here.
Share:

A few months ago I began a photography series recreating the iconic X-men group with cosplay artists. My first character was the Dark phoenix. After completing this, I went to look for the second hero. Of course that called for another screening of the X-men (this time the X-men 2 movie).
I fell in love with The Nightcrawler – Kurt Wagner – and decided he would be my next project.
After making some connections in the cos-players community, I already knew the perfect model for this: TElombre (who has an amazing costume) and a really talented makeup artist – Karen V.
With such a great model and MUA, my biggest challenge was, to recreate the teleportation effect. Sadly, we could not re-create this in-camera :), so I shot the model in three different positions and expressions. And later composed them in post production.
The secret to a good composition is to keep the camera in the exactly the same position (tripod) and keep the lighting either similar, or motivated. Here is the video showing both the shoot and the edit:
(Slide the photo to see the before photo…)
The Composite


I used a fairly simple lighting setup for the composite. A soft on axis fill light and two bare Yongnuo YN568ex II strobes for some hard rim light.

Here are the post production steps taken to create the full composite (you can follow from 00:45 in the video).
Aside from the regular dodge and burn and some frequency separation for processing the model(s) I also did the following:
Layer Merge – I ended up with 3 images with the same model in different locations. Using photoshop’s selection tool and the layer blending options, I created one image with the “three” models.
Movement Effect – Nightcralwer’s power is his ability to transport, and to stay true to the movie representation I wanted it to look like he phased in while moving, I used motion blur for this.
Smoke Brushes – Again staying true to the movie, Nightcralwer teleports with a trace of black smoke. I used a collection of smoke brushes for this.
Light Flares – this was the final step to give the photo a more cinematic look. Not having any flares of my own, I used some flares from the Image Manipulation Store.
We shot two other portraits of Nighcrawler on that night, here are the before& afters and the lighting diagrams for them. Other that the compositing part, post processing was pretty similar.
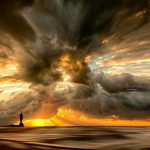
Portrait #1


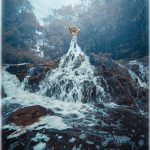
Portrait #2


About The Author
Frederic Amadu is a freelance photographer based in Chelles, France. You can visit his website here, follow him on facebook here and watch his Flickr here.
We love it when our readers get in touch with us to share their stories. This article was contributed to DIYP by a member of our community. If you would like to contribute an article, please contact us here.

Join the Discussion
DIYP Comment Policy
Be nice, be on-topic, no personal information or flames.
2 responses to “How I Shot And Edited A Photo Of The X-Men Nightcrawler”
“the x-men” or “this x-man” not “the x-man”
Processing looks cheap and, I think, it is because of chosen color tones. For example, in “PORTRAIT #2”, admiral blue face clashes with cobalt blue background. And because background and face has such cold color tone – it looks, that the main focus of the photo is jacket, because it is only thing, that is somewhat warm.
Basically, I think, that retoucher/photographer is self taught, without any background in arts education. He has a good grasp on technical part of photoshop, but almost none on Color Theory.
My genuine advice is: Get a few art basics/history books, from local library. It will help you to get to the next level.
ps.
As well, lens flares doesn’t make any sense, There are anamorphic lens flare streaks, with perfectly round halos.
:D