


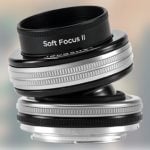
Build your own Lensbaby style DIY soft-focus lens for under $15
Jan 27, 2017
John Aldred
John Aldred is a photographer with over 25 years of experience in the portrait and commercial worlds. He is based in Scotland and has been an early adopter – and occasional beta tester – of almost every digital imaging technology in that time. As well as his creative visual work, John uses 3D printing, electronics and programming to create his own photography and filmmaking tools and consults for a number of brands across the industry.
Share:

Constructing your own lens can seem like an impossible task. When you look at the amount of engineering in modern lenses, how can you possibly do it yourself? Well, you might not get quite the clarity of super high end lenses, but making your own is definitely doable. These days, you can even 3D print a lens, or a complete camera.
This video, though, by photographer Randy Snook, takes things down to the bare basics. Using little more than a couple of plumbing parts, a lens adapter ring, and a piece of glass, Randy builds a lens. The results really aren’t that bad, either, all things considered.
Granted, this DIY lens isn’t a look that everybody’s going to want. But, if you’re after that soft look for a particular image, it’s a neat little project to try. Getting it in camera is also a lot easier than trying to replicate it in post, too.
To make it, you’ll need only a few small items.
- 1-1/4″ PVC joint union pipe fitting – $5
- 65mm Positive meniscus lens element (#L5032) -$5
- 55mm Canon mount reversing ring -$2-3
You’ll also want a bit of paint and glue, too.
The first step is to dismantle the union fitting and discard a couple of the parts we don’t need. Then spray paint the remaining parts black. This prevents light from bouncing around inside once it becomes a lens.

With the pieces painted and dry, it’s ready to start assembly, which really couldn’t be any simpler.
The first issue to tackle is how to mount the thing to a camera. This is where the 55mm Canon mount reversing ring comes into play. While there are no matching threads on the PVC fitting, you can “jam fit” the ring into place, forcing it to cut threads of its own into the plastic. You need to make sure when you do this, that you keep the two pieces parallel. It’s easy to have it slip out of alignment and go in at an angle if you’re not careful.

Once you can see that it’s going in straight, just tighten it down as much as you can. When it’s all the way in, a small amount of superglue around the edge holds it steady in place.
Next the meniscus element goes into the other half of the union fitting. With the “front” facing down (threads at the top), you want to orient the lens so that the convex side is facing down toward the table. The element here is just slightly larger than the hole. You’ll want to get it as centred as possible over the opening.
Instead of going back to the superglue, Randy uses a hot glue gun to mount the element permanently in place.

Once it cools down and sets hard, just screw the two pieces together, and mount it to the camera. The screwing action built into the pipe fitting is what allows the lens to focus, which should still go all the way to infinity.
As it is at this point, it has a single aperture, which Randy says is approximately f/1.4. Although he shows how you can create aperture inserts to help stop it down and increase depth of field a little. It also helps, somewhat, to control some of the softness. These are made simply from cutting out card, then spray painting them black.
Randy shows a couple of examples of the lens with and without an aperture insert.


A cool DIY experiment to play around with optics. It certainly has a rather interesting look, reminiscent of some Lensbaby products. So, if you’ve been thinking about getting one, but aren’t quite sure whether you’re ready to spend, you can first have a go at building your own very inexpensively.
Have you built your own lenses before? How did you do it? Was it a similar idea to Randy’s or something completely different?

John Aldred
John Aldred is a photographer with over 25 years of experience in the portrait and commercial worlds. He is based in Scotland and has been an early adopter – and occasional beta tester – of almost every digital imaging technology in that time. As well as his creative visual work, John uses 3D printing, electronics and programming to create his own photography and filmmaking tools and consults for a number of brands across the industry.


Join the Discussion
DIYP Comment Policy
Be nice, be on-topic, no personal information or flames.
4 responses to “Build your own Lensbaby style DIY soft-focus lens for under $15”
Daniel Tuesta
So I can do everything that this lens can do in the Photoshop and then some. If you want all this effects, why bother tinkering with the hardware when you can do it in post-processing. As long as you are making unreal stuff anyway, there is no moral/ethical issue to tackle as well.
Perhaps some people just find it… I dunno… fun?
As much as I enjoy applying post processing effects and filters, Thomas has a very good point. Plus, getting a “processed” image straight out of the camera saves time.