


The Strobist Corner: A Quadzillion Duty Light Source
Aug 4, 2010
Udi Tirosh
Udi Tirosh is an entrepreneur, photography inventor, journalist, educator, and writer based in Israel. With over 25 years of experience in the photo-video industry, Udi has built and sold several photography-related brands. Udi has a double degree in mass media communications and computer science.
Share:
") A long while back David Hobby did a double duty assignment where he asked participants to use a single light source to perform several lighting function. A huge deal later I saw a great video from Jim Talkinton about using mirrors as a way of expanding a light source and became obsessed with it.
A long while back David Hobby did a double duty assignment where he asked participants to use a single light source to perform several lighting function. A huge deal later I saw a great video from Jim Talkinton about using mirrors as a way of expanding a light source and became obsessed with it.
In this post, I will share my experience with creating a setup that only uses one very cheap work light on a stick-in-a-can and lots of mirrors from a Dollar store (or Amazon). The premise is that you can light well on the cheap. Mucho strobismo.
Here is the fun bit, lighting for this setup only costs about $10. The step by step is right after the jump.
The resulting image is on the top of this post. We’ll get back to it, but first, lest see what we started with.
Actually, just before we start breaking this down, If you like this kind of stuff, you should consider reading Light Science and Magic, definitely a great companion when trying to pull a trick like this. Back to the setup…
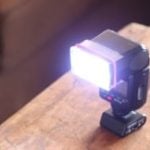
This is the general setup I used, A single light source, a clamp worklight on a stick-in-a-can. As you can see in the first image with this setup, it is a dramatic shot, we have the highlights on the roof, and the shadow falling forward. Details, however, well, this can be improved.

As you can see in the setup shot, the red background was washed with light. The first thing that I did was to tape a cardboard flag on the worklight. This gave me a darker red to work with. This is one of the first things I did. As a result I got the following image.

I can do better with the details on the front, or lack thereof. But first, I set the background, a round mirror borrowed from my wife’s dresser and placed on the floor did the trick.

Now, lets take care of those details. First thing was to add some details on the chain. I it made from a black reflective plastic. I faced a wooden block covered with aluminum foil just covering the family of angles. This provided little bit of details on the chain. From now on we are going to follow a setup/result kinda pace.


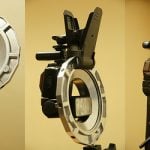
Next up were the dead windows, those were taken care of using a mirror placed right in front of the caterpillar.


This is already looking a little better. But the front window is still kinda dark and a lifting fork is lacking punch. This was taken care of using another mirror placed on camera left.


Looking to draw a bit more attention to the driver’s chamber, I used a small concave mirror and pointed it at the driver’s sit. It is placed right next to the aluminum cube is light is coming from the same direction.


Looks good, but still missing something. The caterpillar logo’s quite dark, I used another concave mirror to provide some more highlights on it. This time, the mirror is placed closer to provide stronger light. (Please ignore the big block in the setup shot, don’t really know why it is there).


I was not yet happy with the back ground. So, the last thing I did was to tilt the light just a bit, this provided some flare, usually I’ll try to avoid it, however it this picture it worked well. Let’s review the image that opened the post again. If I remember correctly, I also bumpped the exposure a bit.

And there you have it, all done with one light source, some mirrors and a very sturdy tripod. This is definitely a path I am going to explore more.

Udi Tirosh
Udi Tirosh is an entrepreneur, photography inventor, journalist, educator, and writer based in Israel. With over 25 years of experience in the photo-video industry, Udi has built and sold several photography-related brands. Udi has a double degree in mass media communications and computer science.


Join the Discussion
DIYP Comment Policy
Be nice, be on-topic, no personal information or flames.