


ESO’s VST Celebrates 15th Anniversary with Gum 10 Nebula Image
Jun 8, 2026
Soumyadeep Mukherjee
Soumyadeep Mukherjee is an award-winning astrophotographer from India. He has a doctorate degree in Linguistics. His work extends to the sub-genres of nightscape, deep sky, solar, lunar and optical phenomenon photography. He is also a photography educator and has conducted numerous workshops. His works have appeared in over 40 books & magazines including Astronomy, BBC Sky at Night, Sky & Telescope among others, and in various websites including National Geographic, NASA, Forbes. He was the first Indian to win “Astronomy Photographer of the Year” award in a major category.
Share:
Massive star-forming regions shape the structure and chemical evolution of galaxies. Inside these environments, ultraviolet radiation, stellar winds, magnetic fields, and dense molecular clouds interact continuously over millions of years. Young stars inject enormous amounts of energy into the surrounding interstellar medium, while cold gas clouds collapse under gravity to form future stellar generations.
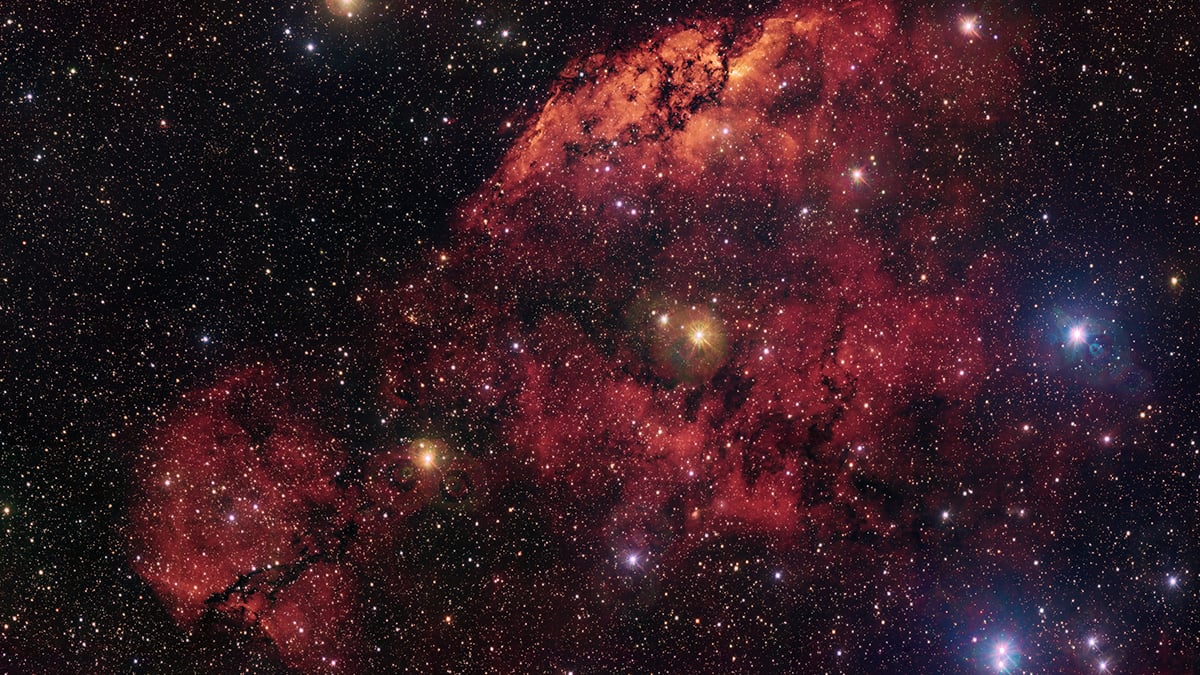
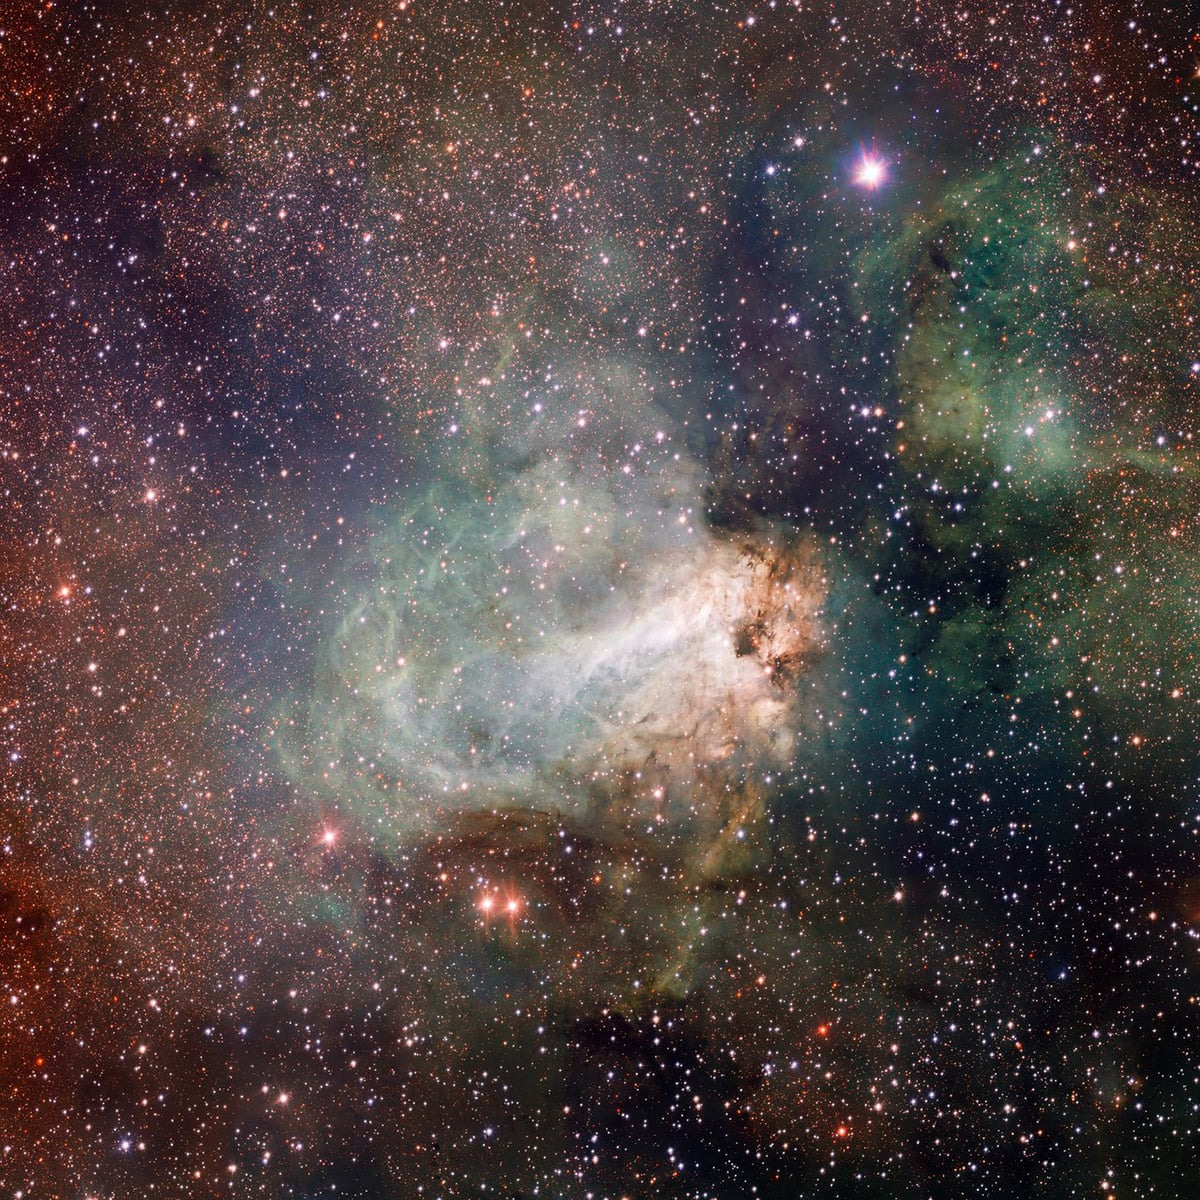
A newly released image from the European Southern Observatory presents one such environment. Captured using the VLT Survey Telescope at Paranal Observatory in Chile, the image shows the emission nebulae Gum 10 and Gum 11 embedded deep within the southern plane of the Milky Way. The release also marks the fifteenth anniversary of the VLT Survey Telescope’s first light observations. Over the past decade and a half, the instrument has produced some of the most detailed wide-field views of the southern sky ever obtained from Earth.
The physics behind the red hydrogen glow
The dominant red emission visible throughout the image comes from ionized hydrogen gas. Gum 10 and Gum 11 belong to a class of astronomical objects known as H II regions, which form around hot young stars. These stars emit intense ultraviolet radiation capable of stripping electrons from surrounding hydrogen atoms. Once the electrons recombine with the atoms, the gas releases energy at specific wavelengths, including the strong hydrogen-alpha emission line visible in deep astronomical imaging.
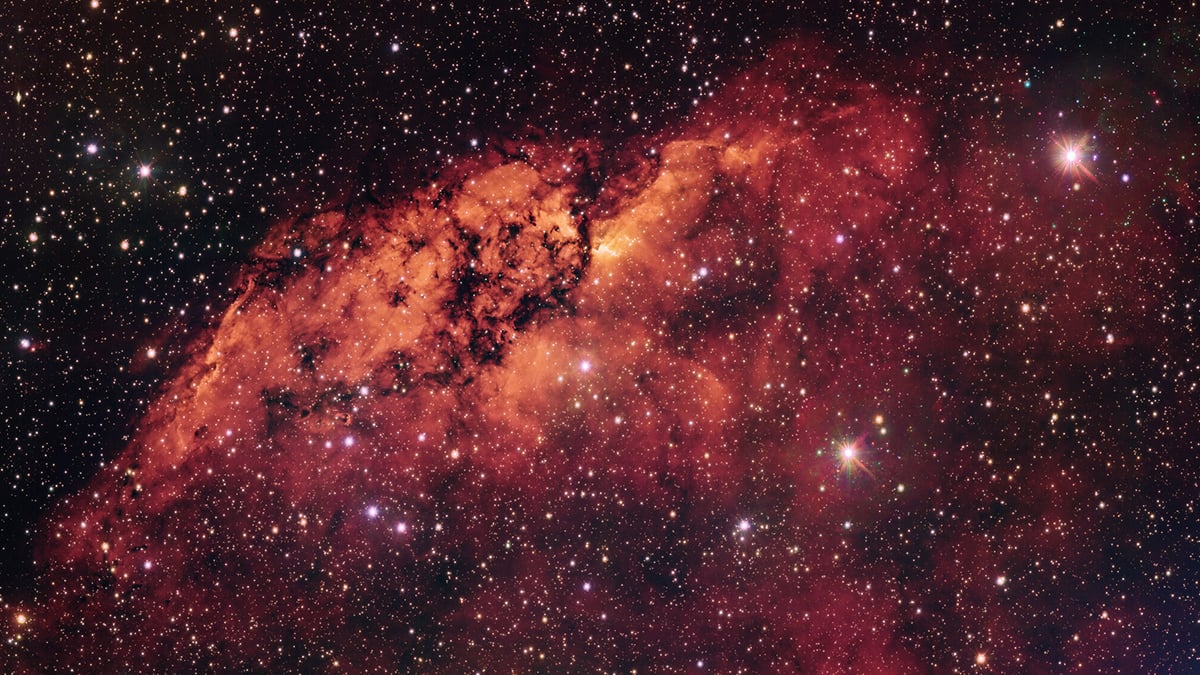
This mechanism gives emission nebulae their characteristic crimson appearance. However, the image reveals far more than a simple glowing cloud. The hydrogen structures appear fragmented and highly irregular. Bright ridges curve through the nebulae, while faint filaments stretch outward into surrounding space. Some areas look compressed and compact. Others appear diffuse and partially disrupted.
The brightest portions of the nebula likely contain regions where gas density remains especially high. These compressed areas often become important sites for future star formation. Astronomers continue studying how stellar feedback influences the birth of new stars because the process can either trigger collapse in nearby clouds or disperse star-forming material completely.
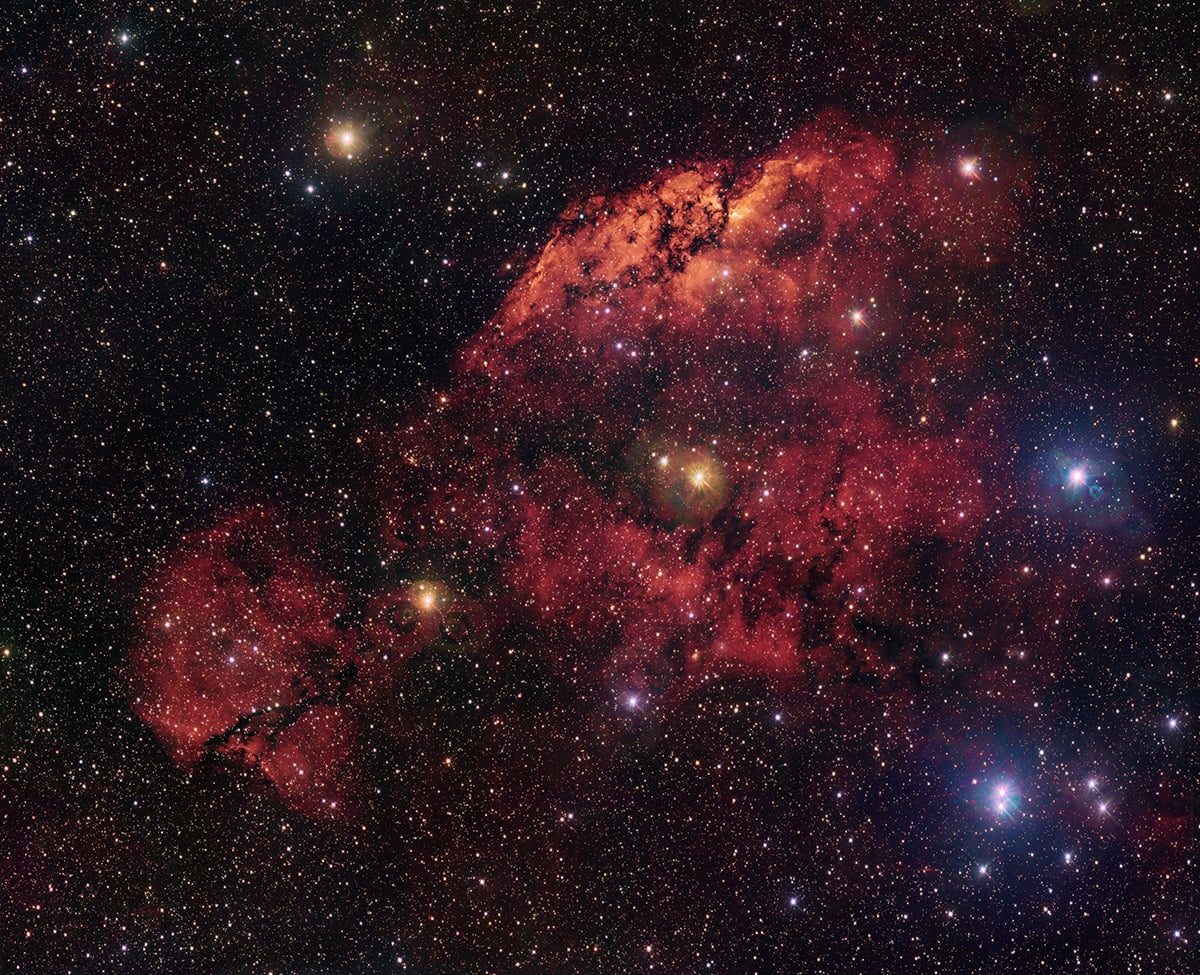
Dark dust clouds shape the structure of the nebulae
Although the glowing hydrogen attracts immediate attention, the dark dust lanes play an equally important role in the image. These structures consist of dense clouds of microscopic dust particles mixed with cold molecular gas. The dust absorbs and scatters visible light, which creates the striking black silhouettes visible throughout the field.
Many newly forming stars remain hidden inside these clouds for long periods because visible light cannot escape easily through the dense material. Infrared observations often reveal embedded stars long before optical telescopes can detect them. Some of the darkest regions inside Gum 10 and Gum 11 may already conceal entire clusters of young stellar objects.
The dust also gives the image much of its depth and texture. Thick lanes cross the glowing hydrogen in irregular patterns, creating strong visual contrast between bright and dark regions. Smaller globules and fragmented clumps are also scattered throughout the field. These structures reveal how uneven and chaotic the interstellar medium can become inside active star-forming environments.
The VLT Survey Telescope
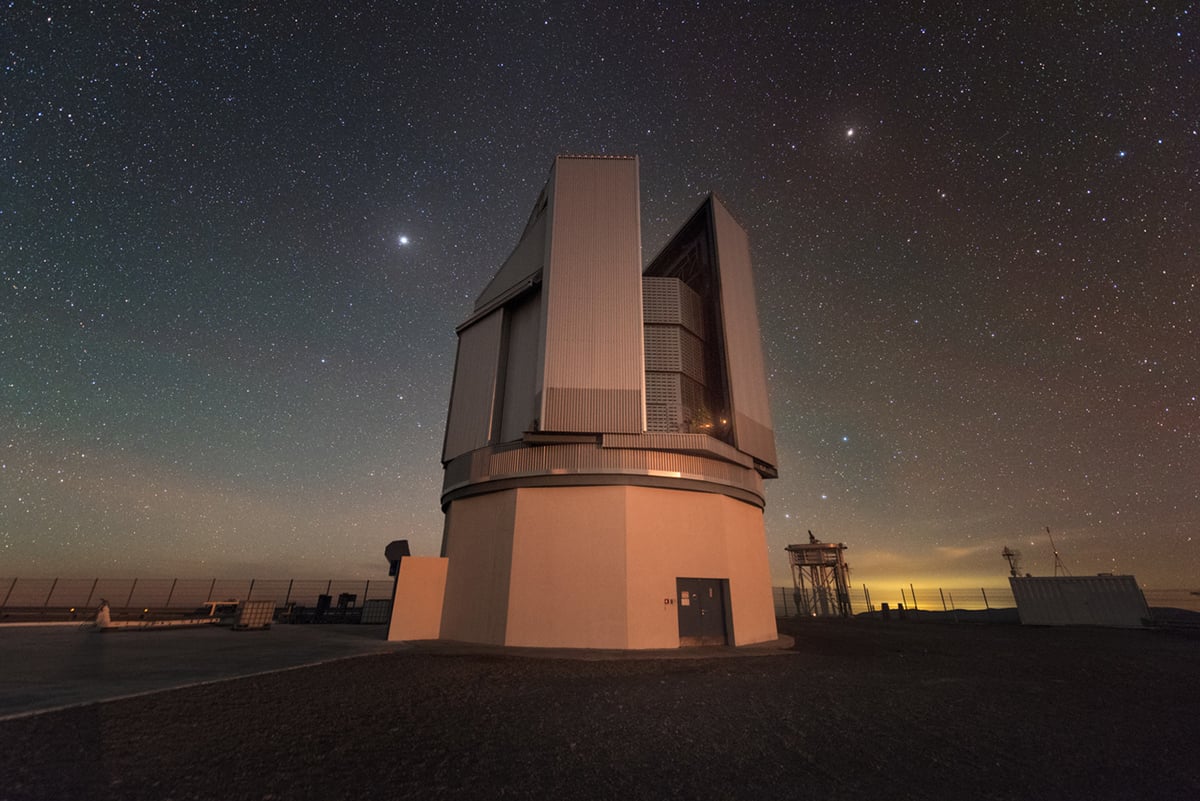
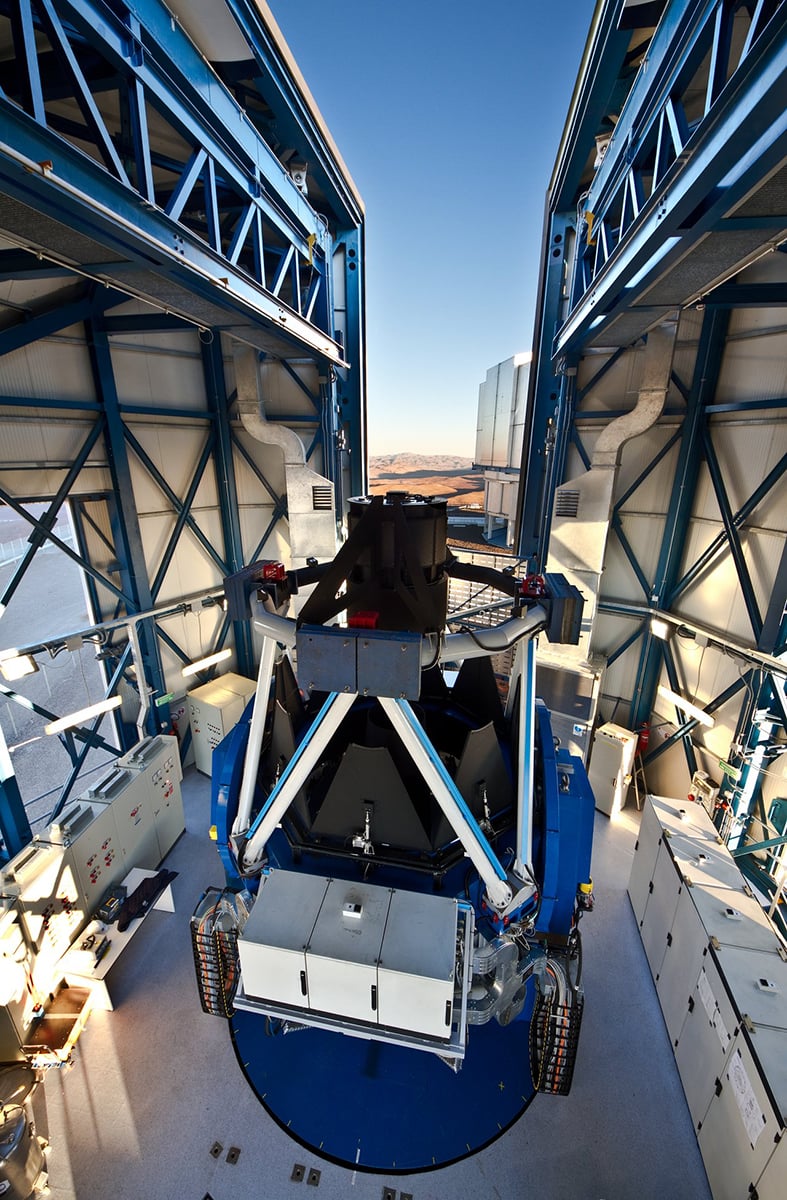
The image was captured using the VLT Survey Telescope, a 2.6-meter telescope located at ESO’s Paranal Observatory in northern Chile. Unlike telescopes designed primarily for extremely high magnification, the VST specializes in wide-field observations. It can record enormous sections of the sky in a single exposure while maintaining excellent resolution across the entire field.
The instrument carries OmegaCAM, a massive imaging camera containing hundreds of millions of pixels. The telescope and camera system allow astronomers to map huge areas of the Milky Way efficiently and with exceptional detail.
The Gum 10 and Gum 11 image comes from the VPHAS+ survey, formally known as the VST Photometric H-alpha Survey of the Southern Galactic Plane and Bulge. The project aims to study the structure and stellar populations of the southern Milky Way using multiple optical filters, including a narrowband hydrogen-alpha filter optimized for detecting ionized gas.
Celebrating fifteen years of the VLT Survey Telescope
ESO released the Gum 10 and Gum 11 image to celebrate fifteen years of scientific operations by the VLT Survey Telescope, better known as the VST. The telescope achieved its “first light” in 2011 at Paranal Observatory in Chile and soon became one of the most important survey instruments in the southern hemisphere.
Built through a collaboration between ESO and the Italian National Institute for Astrophysics (INAF), the VST was designed to map large sections of the sky with high resolution and exceptional image quality.
Over the last decade and a half, the telescope has contributed to several major surveys of the Milky Way and the distant universe, producing detailed datasets used by astronomers worldwide. Unlike larger telescopes that focus on small and extremely distant targets, the VST excels at capturing wide cosmic landscapes filled with nebulae, star clusters, and galaxies.
Clear skies!

Soumyadeep Mukherjee
Soumyadeep Mukherjee is an award-winning astrophotographer from India. He has a doctorate degree in Linguistics. His work extends to the sub-genres of nightscape, deep sky, solar, lunar and optical phenomenon photography. He is also a photography educator and has conducted numerous workshops. His works have appeared in over 40 books & magazines including Astronomy, BBC Sky at Night, Sky & Telescope among others, and in various websites including National Geographic, NASA, Forbes. He was the first Indian to win “Astronomy Photographer of the Year” award in a major category.
Related Posts
 OM System celebrates OM-1’s 50th anniversary with a new camera announcement on February 15th
 Leica celebrates 100th anniversary with videos, a book and limited edition products
 Hasselblad celebrates its 80th birthday with the $15,000 Anniversary Edition 907X
 Samyang celebrates its 50th anniversary with an updated AF 50mm F1.4 FE II
Join the Discussion
DIYP Comment Policy
Be nice, be on-topic, no personal information or flames.