


Avoid Sun On Your Screen By Building A DIY Monitor Hood
Nov 7, 2011
Udi Tirosh
Udi Tirosh is an entrepreneur, photography inventor, journalist, educator, and writer based in Israel. With over 25 years of experience in the photo-video industry, Udi has built and sold several photography-related brands. Udi has a double degree in mass media communications and computer science.
Share:
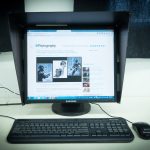
 If you have ever taken your monitor outside, you know that it is hard to see it clearly with all the light that is bouncing around. And even more so on a sunny day on a sunny location. Of course, you could always buy one of them Monitor Hoods. but it would be so nice to make one of your own. Especially when it only takes a few minutes and costs almost nothing.
In this tutorial, Roger Sacul will show us how to make a quick and simple DIY monitor hood. The one here is used on flat screens, but you can also use it for laptops, or build smaller version for camera hoods.
We use plastic here, which you can score at the local art store (ask for plastic sheet) or home depot (ask for plexi) but you can use foamboard if you want something more. hmm. quicky.
1. First we need to create a scheme. This is a quick and dirty way of doing this, so feel free to use a ruler instead ;) Download a manual for an EIZO CG241W [pdf link] which is approx. the size of a standard monitor. Open up page 33 and rotate the site to the left/right and re-size it to size of your monitors size. Prepare an A3 or 2x A4 sheets and a blunt pencil. Now carefully place the sheet on your monitor and draw the contours of the side panel. Finally cut out the drawn side panel.

2. Now transfer the side panel onto cardboard. Place the sheet on a cardboard and draw the curve of the side panel. Use a ruler to draw the straight lines. (Of course, you can use black foamboard that you have left from previous projects ;) and save a few steps, but if you want the full thing, it does not really matter what you use now.

3. Now cut out the whole thing.

4. Place the cardboard on a material which you want to use. I bought a 100x50cm piece of plastic in at a local home depot. Draw the side lines onto the plastic an cut it out really slowly and carefully using a cutter or/and a jigsaw.

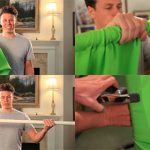
5. Round off the edges with an smooth abrasive paper. Cut an L shape plastic bar to the size of the upper side of the panel and stick them together as shown above

6. Cut a little piece (approx. 2cm) of the L shape plastic bar and stick it to the side panel

7. The top part should be the length of your monitor. If you use a monitor calibrator like a datacolor spyder or colormunki you will need to cut out a hole right in the center of the edge

8. Place 1 or 2 pieces of velcro on the L shaped bar which will be placed as seen in below pictures. Remember if you use a monitor calibrator you can’t place the velcro in the center, that’s why I used 2 of them

This is how the hood looks when completed, the numbers correspond to the steps above.


Here is how it looks like completed. A very nice and 100% pro looking hood.


Udi Tirosh
Udi Tirosh is an entrepreneur, photography inventor, journalist, educator, and writer based in Israel. With over 25 years of experience in the photo-video industry, Udi has built and sold several photography-related brands. Udi has a double degree in mass media communications and computer science.


Join the Discussion
DIYP Comment Policy
Be nice, be on-topic, no personal information or flames.
10 responses to “Avoid Sun On Your Screen By Building A DIY Monitor Hood”
The manual link doesn’t work, is there a way to get it back up? I would highly appreciate it.
Thank you for the wonderful instructions as well.
The link didn’t work.
Dudes, are you really that lazy to search the site for a new link? It`s obvious that they updated the site and the PDFs have moved.
Here you go, next time remember to use your b _ _ _ n ;)
http://www.eizo.com/global/support/db/products/manual/search?k=cg241W&x=83&y=22
thanks d0zz,
I updated the post.
In the manual on page 33, I’m assuming I need to match up the measurements of my monitor to that in the diagram to create a perfect cut-out ?
I wanted something quicker and cheaper: I went with foamcore, but used white and covered the inside with dark construction paper using spray adhesive. I have wallpaper on the wall behind my desk. I “plan” to cover the outside with a remnant, but frankly the white foamcore looks fine. Black would have been too obtrusive in my home office. I used this suggested template, but made it fit without velcro: I used white elastic cord, not very big, because I won’t be removing the hood very often.
My eye fatigue is noticeably less. THANKS FOR SAVING ME $120–250 over buying a ready-made hood. This isn’t precious, should I change to a different sized monitor and need a new hood. Such a great addition to my workstation.
Where at Home Depot is it? I asked a bunch of people and they can’t find it.
Excelent! I did it and hood lookings great. I changed some steps because my monitor need breathing on the top. Thank you so much. https://uploads.disquscdn.com/images/68eea546d8eb2faf767463df3eb8dbcc3b9713a9275dc1ba8aa7faf2baa59c7b.jpg
I just finished my own monitor hood for my Dell U2413. I posted a walkthrough of my build along with a few improvements on this design. Check it out – https://ericsantiago.com/2017/02/09/diy-monitor-hood/
https://uploads.disquscdn.com/images/f78d39f061c4bcfc409cc2f008a48e6be63dd0d12ca031ae420474e4a6196da5.jpg
ok, you’re the guy to ask, but what i need is to build a sun block around the 7″ video monitor shade because no matter how great the shade is, when i’m covering sports and must shoot directly into the lights or sun, i get blinded and can’t see anything, what i need is a 4-6″ fan around the shade to block that. surprised it doesn’t exist. ideas welcome.